Coding Agent with Self-hosted LLM: End-to-End Control with Opencode and vLLM
Coding agents are becoming ubiquitous, and the voices doubting their usefulness are getting quieter.
For such an essential tool, it’s good to know that there’s always the option to self-host the full stack end-to-end. Thanks to the great work of folks building Opencode, vLLM, and open-weight LLM coding models, it’s actually quite accessible to get up and running in just a few minutes — as long as you have access to a beefy enough GPU that can run your model.
Provisioning a GPU
I’ll be using Lambda as the GPU provider, but any provider should do. You can sign up here. Once you’ve filled in your billing info, you should be able to provision a host with an available GPU fairly easily.
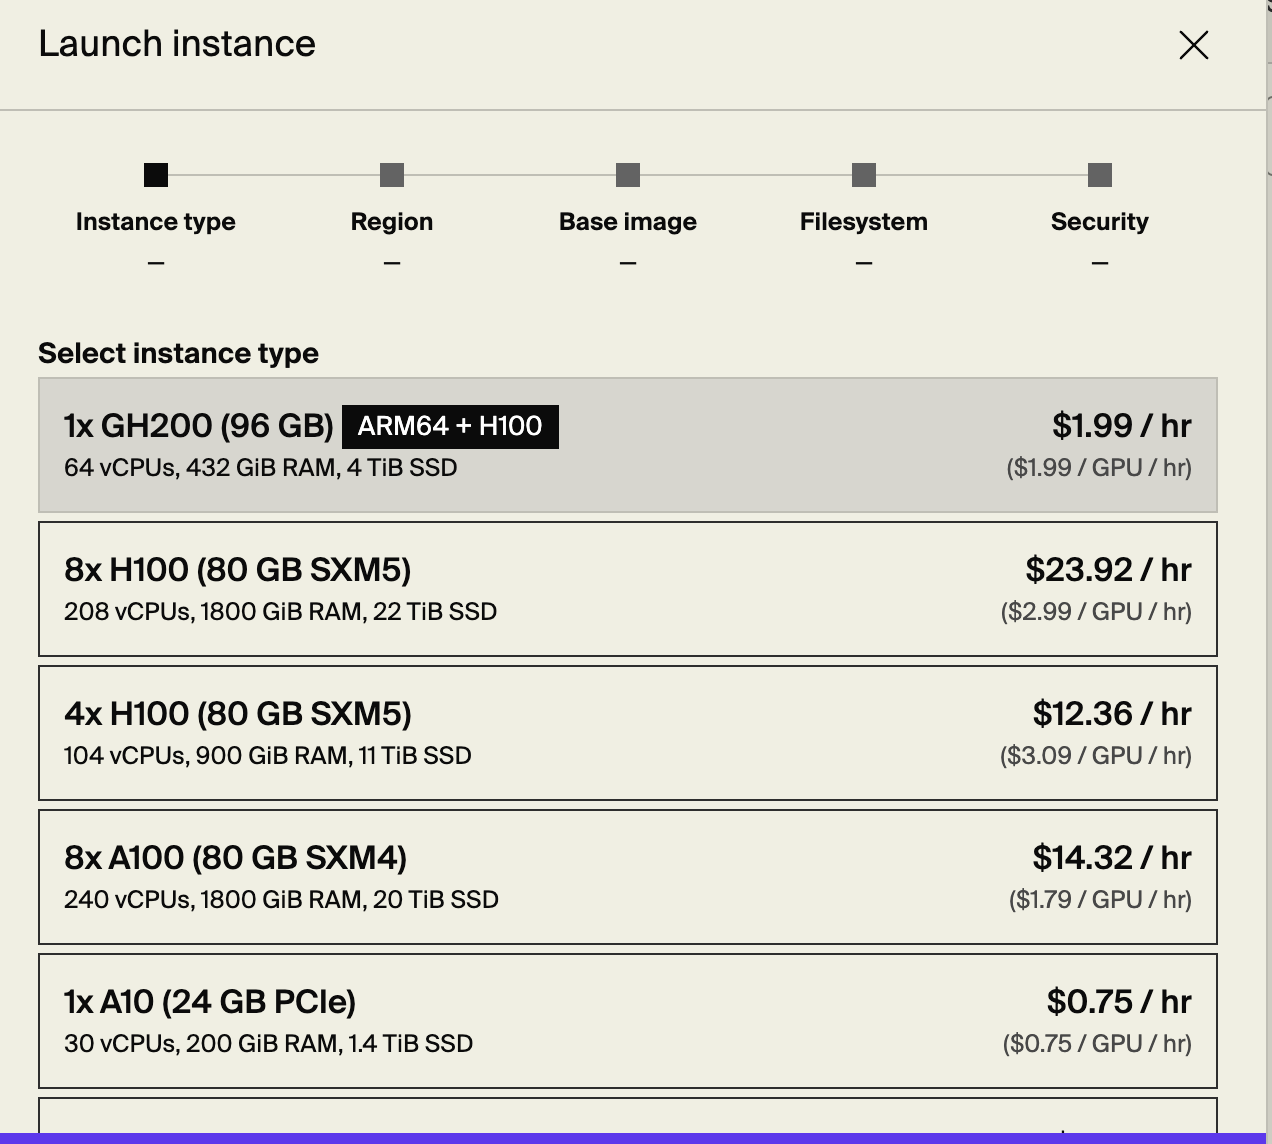
As you can see, GPUs aren’t cheap.
We need to provide a public key so we can later SSH into the machine. After it’s provisioned, you’ll see the IP in the console panel.
1
2
3
export IP=<...>

ssh -i path/to/private_key ubuntu@$IP
We’re in. We’re inside a machine that has an impressive 96GB GPU. Running nvidia-smi, the CLI command that gives us info about the attached NVIDIA GPUs, we get the following output:
1
2
3
4
5
6
7
8
9
10
11
12
13
14
15
16
17
18
19
+-----------------------------------------------------------------------------------------+
| NVIDIA-SMI 570.195.03             Driver Version: 570.195.03     CUDA Version: 12.8     |
|-----------------------------------------+------------------------+----------------------+
| GPU  Name                 Persistence-M | Bus-Id          Disp.A | Volatile Uncorr. ECC |
| Fan  Temp   Perf          Pwr:Usage/Cap |           Memory-Usage | GPU-Util  Compute M. |
|                                         |                        |               MIG M. |
|=========================================+========================+======================|
|   0  NVIDIA A10                     On  |   00000000:06:00.0 Off |                    0 |
|  0%   29C    P8              9W /  150W |       0MiB /  23028MiB |      0%      Default |
|                                         |                        |                  N/A |
+-----------------------------------------+------------------------+----------------------+

+-----------------------------------------------------------------------------------------+
| Processes:                                                                              |
|  GPU   GI   CI              PID   Type   Process name                        GPU Memory |
|        ID   ID                                                               Usage      |
|=========================================================================================|
|  No running processes found                                                             |
+-----------------------------------------------------------------------------------------+
1
2
3
4
5
ls /dev/nvidia*
/dev/nvidia-modeset  /dev/nvidia-uvm  /dev/nvidia-uvm-tools  /dev/nvidia0  /dev/nvidiactl

/dev/nvidia-caps:
nvidia-cap1  nvidia-cap2
As we can see, /dev has our NVIDIA drivers. /dev/nvidia0 is the GPU device.
Running vLLM
We’ll be using vLLM with Qwen2.5-Coder-7B-Instruct (the 7B model works surprisingly well!). vLLM is a high-performance and easy-to-use LLM serving library. You can simply run a Docker command, specify one of the supported models, and it will pull it from Hugging Face. You can also load models from S3 or local storage.
In addition to fast and convenient inference, vLLM supports exposing models via an HTTP server with an OpenAI-compatible API. So you can use it as a drop-in replacement.
1
2
3
4
5
6
7
8
9
10
11
export MODEL="Qwen/Qwen2.5-Coder-7B-Instruct"

# this takes a few minutes
sudo docker run --gpus all --rm -p 8000:8000 \
  vllm/vllm-openai:latest \
  --model $MODEL \
  --dtype auto \
  --max-model-len 32768 \
  --gpu-memory-utilization 0.95 \
  --enable-auto-tool-choice \
  --tool-call-parser hermes
The container uses the host GPUs and drivers because we specified --gpus all. Unlike networking or PID namespaces, GPUs are passed through directly.
1
2
3
sudo docker exec -it 0c52f597abe4 sh
ls /dev/nvidia*
# /dev/nvidia-uvm  /dev/nvidia-uvm-tools /dev/nvidia0  /dev/nvidiactl
The model is downloaded from Hugging Face:
1
ls -lah /root/.cache/huggingface/hub/models--Qwen*/snapshots/*/
--max-model-len limits the maximum length of input + generated output. We also enable tool use and specify the appropriate tool parser so our LLM can handle tool calls — the bread and butter of coding agents.
Accessing the Model Securely (SSH Tunnel)
The model is running on a remote server that, by default on Lambda, only exposes port 22 (SSH). That’s good security hygiene. But we still want to access the model from our local machine.
SSH tunnel to the rescue:
1
ssh -i path/to/private_key -N -L 8000:localhost:8000 ubuntu@$IP
This is local port forwarding. Anything sent to port 8000 on our local machine will be forwarded to port 8000 on the Ubuntu machine at $IP. The traffic travels securely through the SSH tunnel over port 22.
There’s also remote port forwarding (-R) where traffic from the remote machine flows back to a local port. That’s useful if you want to expose a local service to the internet — but that’s not what we’re doing here. So we’ll stick with local forwarding.
Testing the Model
1
2
3
4
5
6
7
8
9
export MODEL="Qwen/Qwen2.5-Coder-7B-Instruct"
curl http://localhost:8000/v1/chat/completions \
  -H "Content-Type: application/json" \
  -d "{
    \"model\": \"$MODEL\",
    \"messages\": [
      {\"role\": \"user\", \"content\": \"Write an HTML page that explores a fun topic.\"}
    ]
  }"
The request takes a few seconds before returning the final output. That’s not ideal.
Like OpenAI’s API, vLLM supports streaming using SSE (Server-Sent Events). We just need to add "stream": true:
1
2
3
4
5
6
7
8
9
curl http://localhost:8000/v1/chat/completions \
  -H "Content-Type: application/json" \
  -d "{
    \"model\": \"$MODEL\",
    \"messages\": [
      {\"role\": \"user\", \"content\": \"Write an HTML page that explores a fun topic.\"}
    ],
    \"stream\": true
  }"
Now we receive tokens incrementally.
Isn’t this great? Any sufficiently advanced technology is indistinguishable from magic. And even when you deploy the whole thing yourself, it still feels that way.
Okay — platitudes quota fulfilled. Let’s proceed.
Connecting Opencode
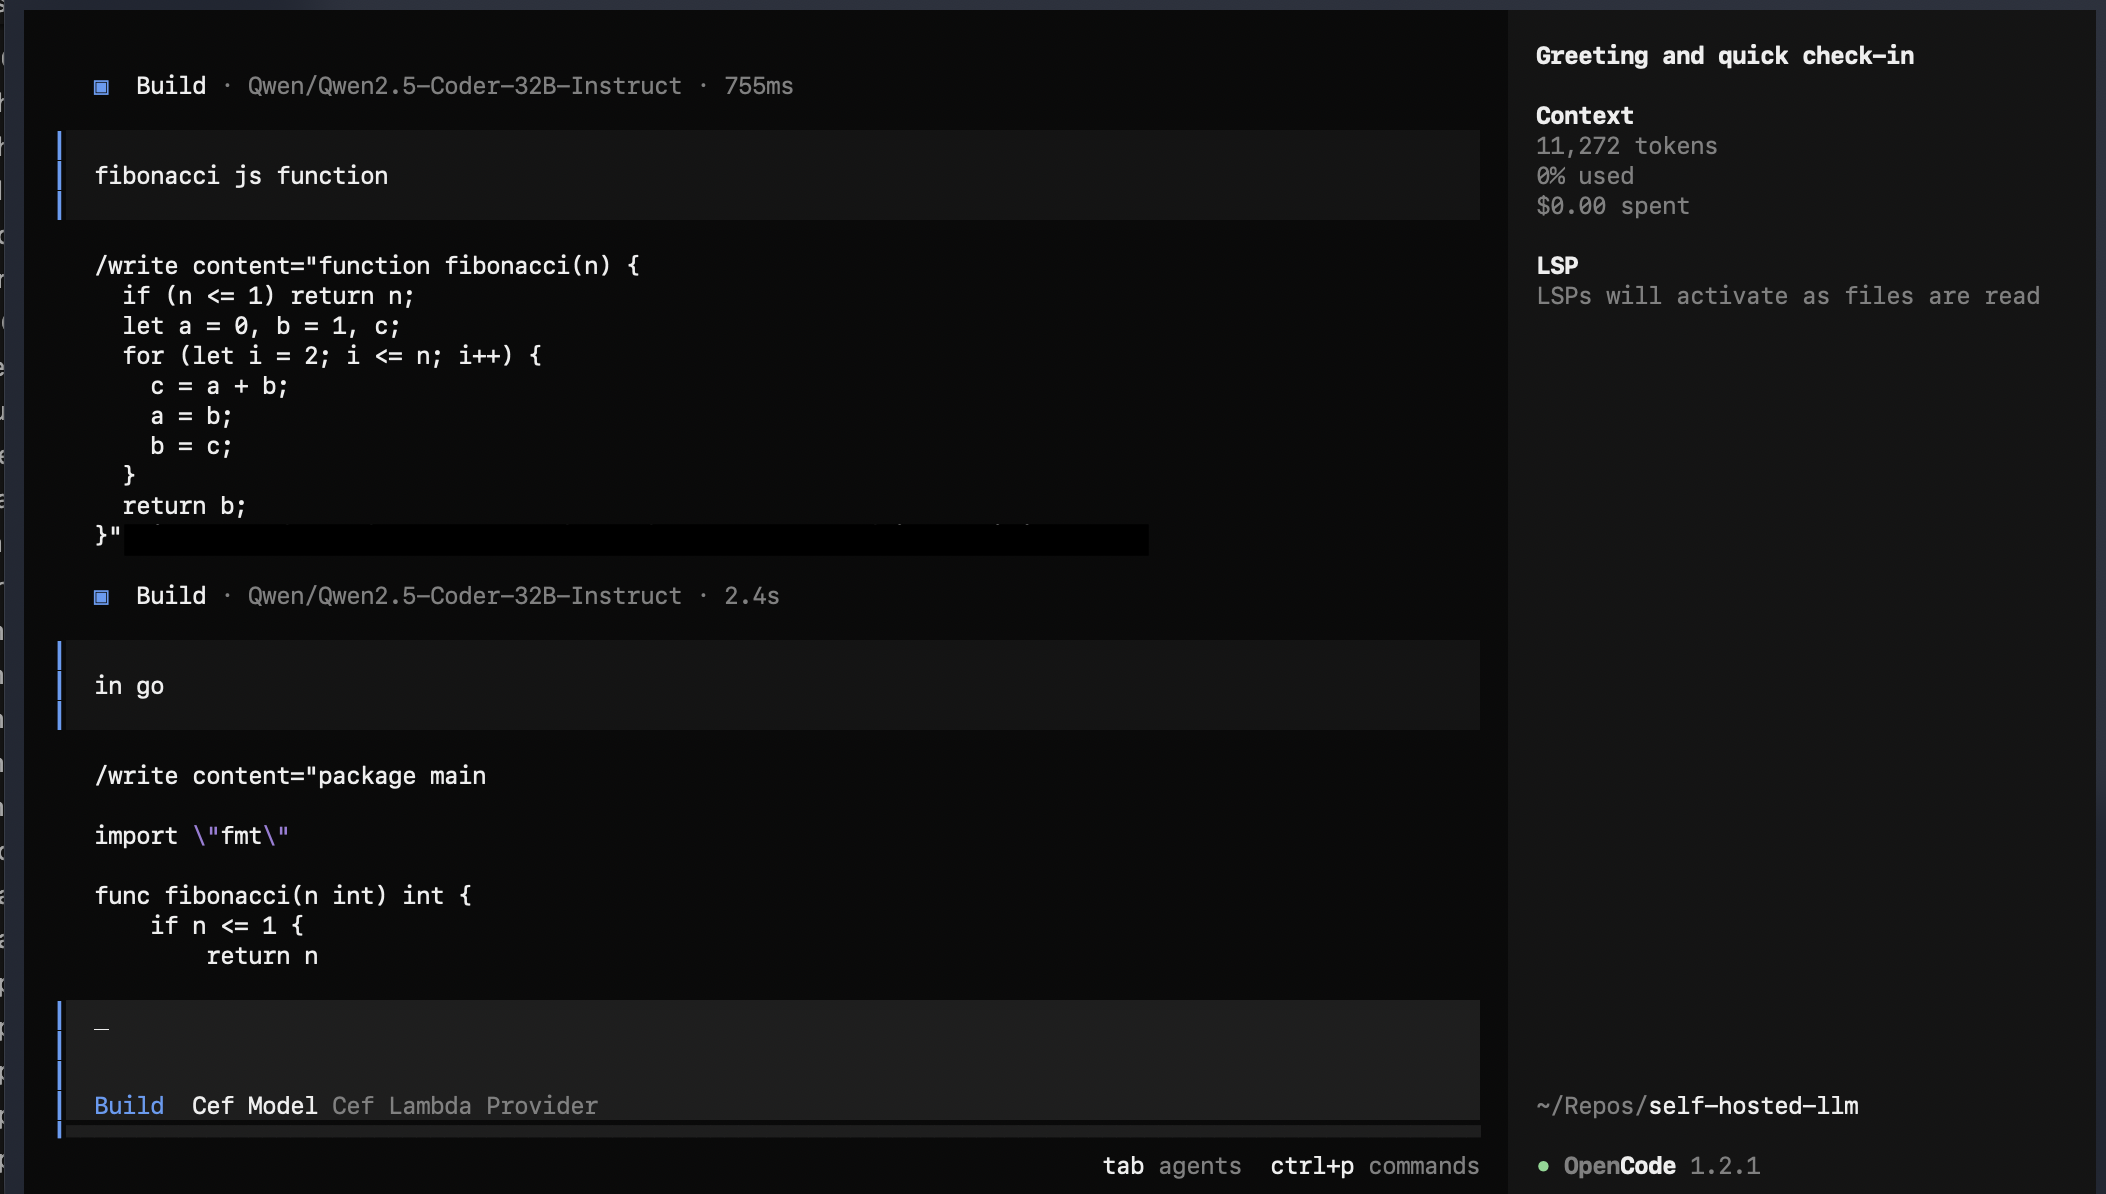
We now have an OpenAI-compatible API. What coding agent is easily configurable with a custom OpenAI-compatible endpoint? Yes — Opencode.
Opencode is an open-source coding agent similar to Claude Code or Codex. It supports a long list of models and providers and relies on Vercel’s AI SDK.
Install Opencode by following the instructions on the download page.
Let’s configure it to use our custom LLM.
In your repo’s opencode.json (or the system-wide one at ~/.config/opencode/opencode.json), paste:
1
2
3
4
5
6
7
8
9
10
11
12
13
14
15
16
17
18
19
20
{
  "$schema": "https://opencode.ai/config.json",
  "provider": {
    "cefprovider": {
      "npm": "@ai-sdk/openai-compatible",
      "name": "Cef Lambda Provider",
      "options": {
        "baseURL": "http://localhost:8000/v1"
      },
      "models": {
        "Qwen/Qwen3-Coder-30B-A3B-Instruct": {
          "name": "Cef Model",
          "options": {
            "max_tokens": 20000
          }
        }
      }
    }
  }
}
Having “Cef” (yours truly) in the names has been shown empirically to make things run more smoothly. I jest, of course.
Open opencode and run /models to select your custom model.
The model should now be ready. Ask it to do something, and it’ll get to work:
On max_tokens
Notice that max_tokens is set to 20000, although the context limit is 32768.
If it’s not configured properly, you may get:
1
'max_tokens' or 'max_completion_tokens' is too large: 32000. This model's maximum context length is 32768 tokens and your request has 10694 input tokens (32000 > 32768 - 10694).
My understanding is that max_tokens must be less than:
1
max_context_length - input_tokens
In this case:
1
32768 - 10694 = 22074
So 20000 works safely within that boundary.
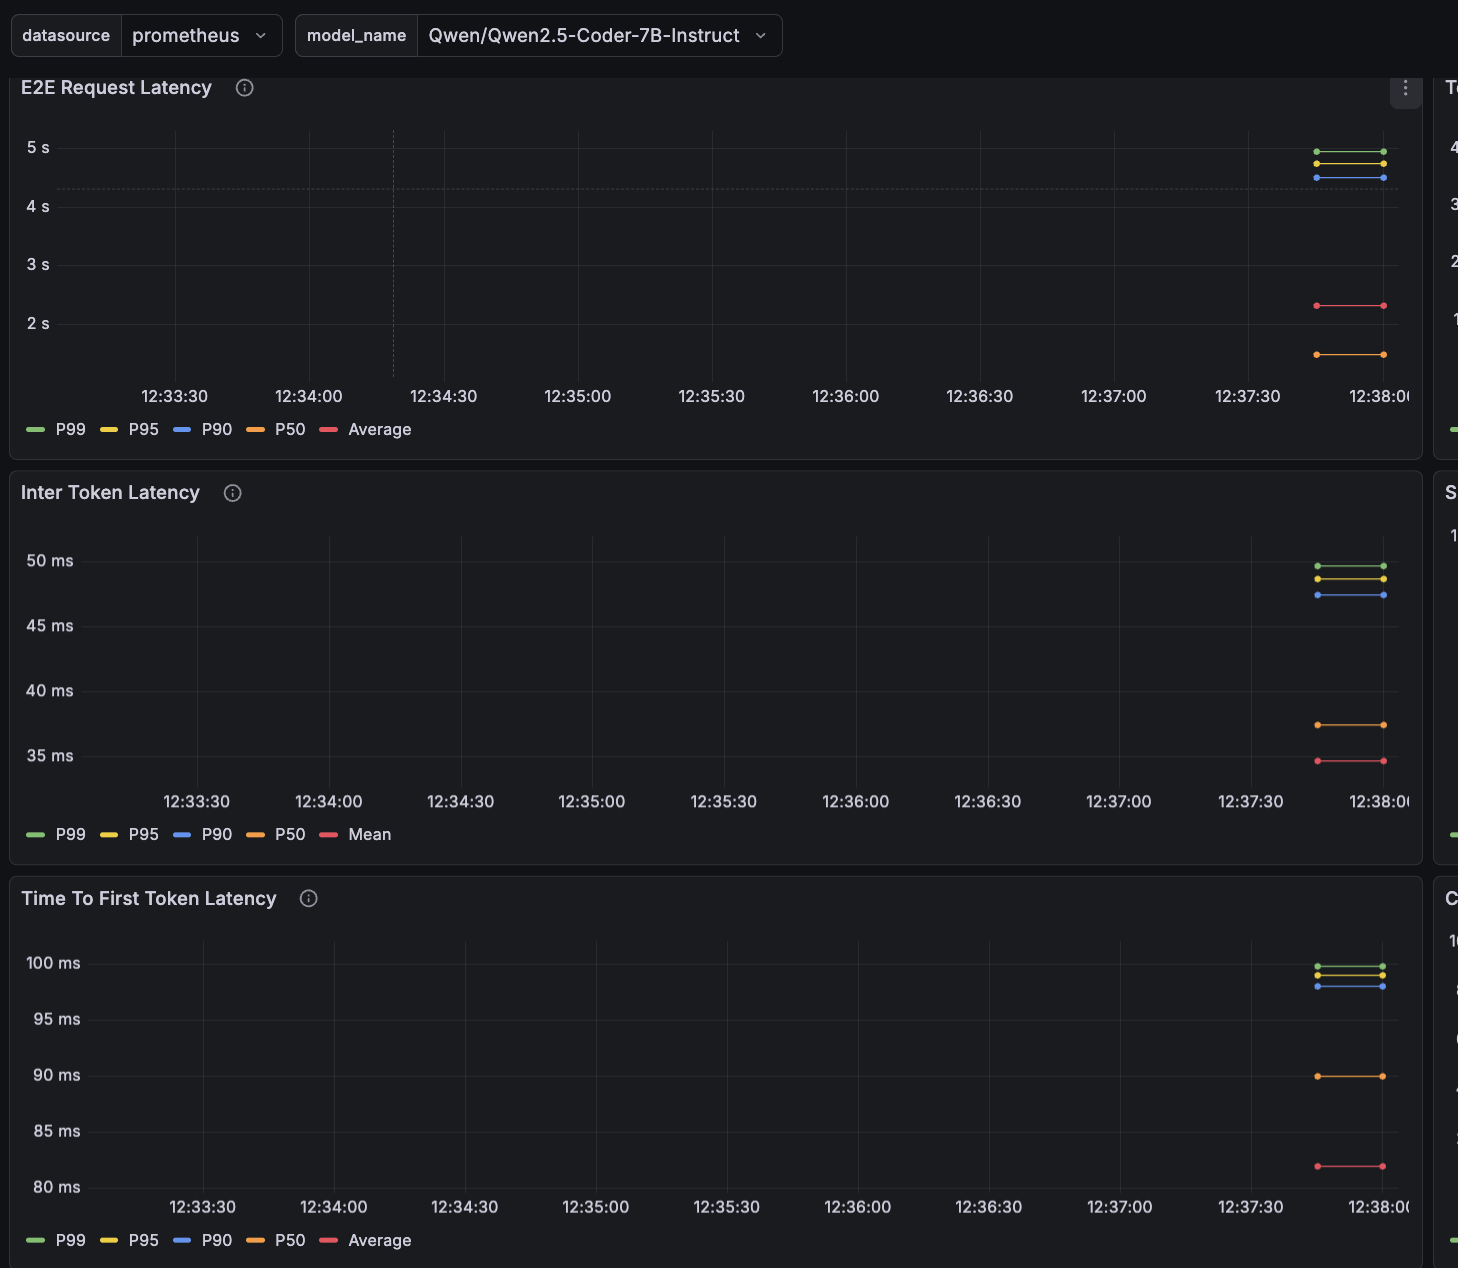
vLLM Metrics
vLLM exposes a /metrics endpoint for observability. It integrates with Prometheus, so you can build a Grafana dashboard.
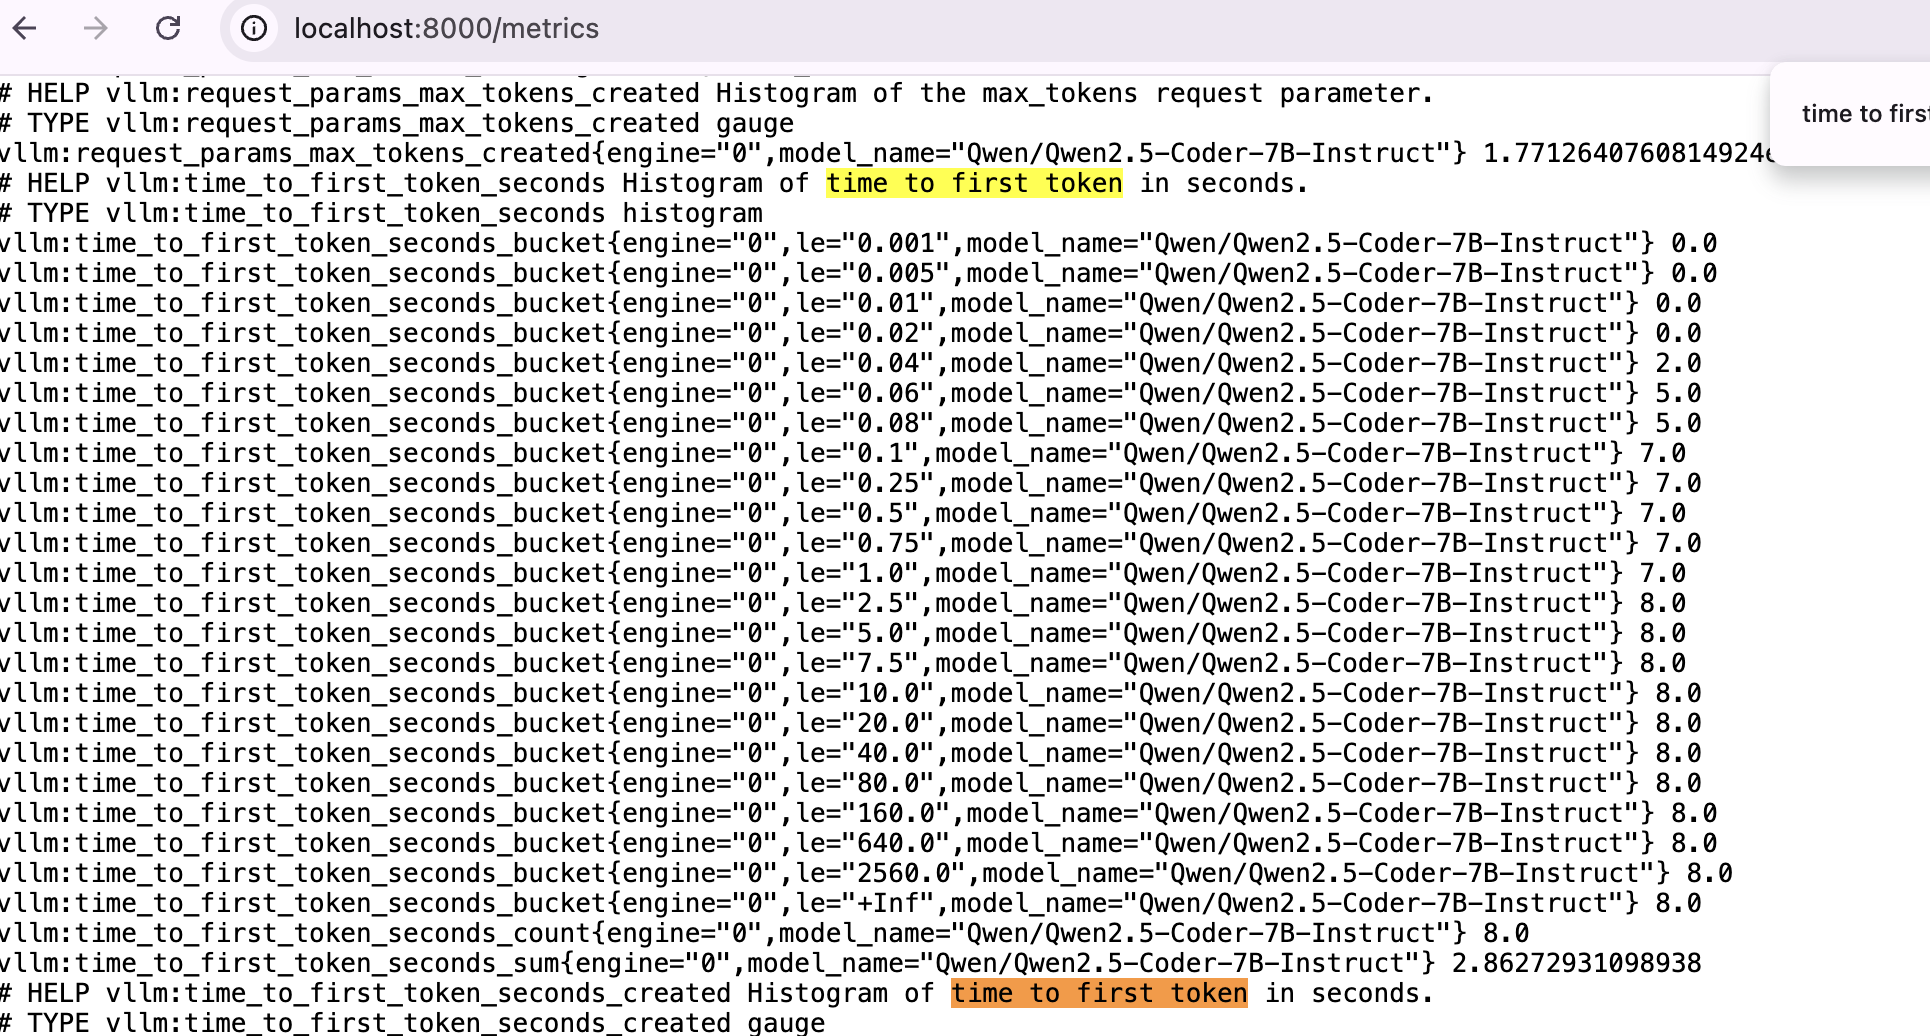
Let’s define a few important metrics:
- E2E request latency: total time from request receipt to the final token.
- TTFT (Time To First Token): time until the first token is generated.
- TPOT (Time Per Output Token) / Inter-Token Latency (ITL): average time between tokens.
TTFT is higher because the first token requires prefill — computing the KV cache for the entire prompt. Subsequent tokens reuse that cache and only compute the new token’s forward pass.
The vLLM repo includes Grafana examples:
1
2
3
git clone https://github.com/vllm-project/vllm.git
cd vllm/examples/online_serving/prometheus_grafana
docker compose up
Create a Prometheus data source in Grafana and upload grafana.json to import the dashboard.
After some usage, we can observe sub-100ms P99 for both TPOT and TTFT. That feels very fast in practice — though it’s expected since this is a relatively small model and we’re not heavily loading it.
And that’s it. A fully self-hosted coding agent stack — model, inference server, tunneling, and agent — under your control, end to end.