How Coding Agents Actually Work: Inside OpenCode
A hands-on exploration of OpenCode, an open-source coding agent built with a client/server architecture. Learn how AI tools, LLMs, and real-world constraints come together to create a powerful developer experience.
Intro
Coding agents are becoming a handy tool for developers (though some still wouldn’t touch them with a ten-foot pole, but that’s a topic for another day). I’ve been experimenting with them lately and wanted to dig deeper into how they actually work.
In this post, I’ll share what I’ve learned exploring Opencode—an excellent 100% open-source Claude Code alternative. It features a TUI and an interesting client/server setup.
Why Coding Agents?
LLMs are incredible repositories of knowledge. They’ve ingested essentially all public code repositories and more. So when you present an LLM with a coding-related task (write new code, explain an error, fix a bug), chances are it has seen something probabilistically similar on GitHub, Stack Overflow, or elsewhere—and it can provide useful insights. Models are now getting so good that they can even tackle certain problems on their own.
So why do we need a coding agent? Why not just stick with the ubiquitous chat interface (ChatGPT)? A few reasons come to mind:
- Constantly pasting snippets, error traces, and files into an LLM gets old fast.
- Copying suggestions or code changes back out is just as tedious.
Giving the LLM direct access to the local environment (or a dev environment) is immensely powerful:
- It can run the test suite after making changes, see the results, reflect on errors, and adjust accordingly.
- It can tap into powerful tools like LSP (Language Server Protocol) servers. For example, the LLM makes a change, it has access to an LSP client which sends
textDocument/didChangeto the server over STDIO, waits for diagnostics, and feeds those diagnostics back into the LLM’s context. This is elegantly implemented in Opencode via an event bus and a global map of diagnostics. - And do you really need to stay in the loop? Not necessarily. Once the LLM has access to code, tools, and feedback, you can assign it a task, walk away, and let it work. It can review code, try out a new feature, or even respond when you tag it in GitHub with a request.
Pretty powerful stuff. But let’s be clear: hallucinations are still very real. An agent can go down a rabbit hole, waste compute, and burn through tokens. People have shared stories of eye-watering usage bills. Still, as models improve—and as we build better tools, workflows, and infrastructure around agents—the payoff only grows.
Architecture
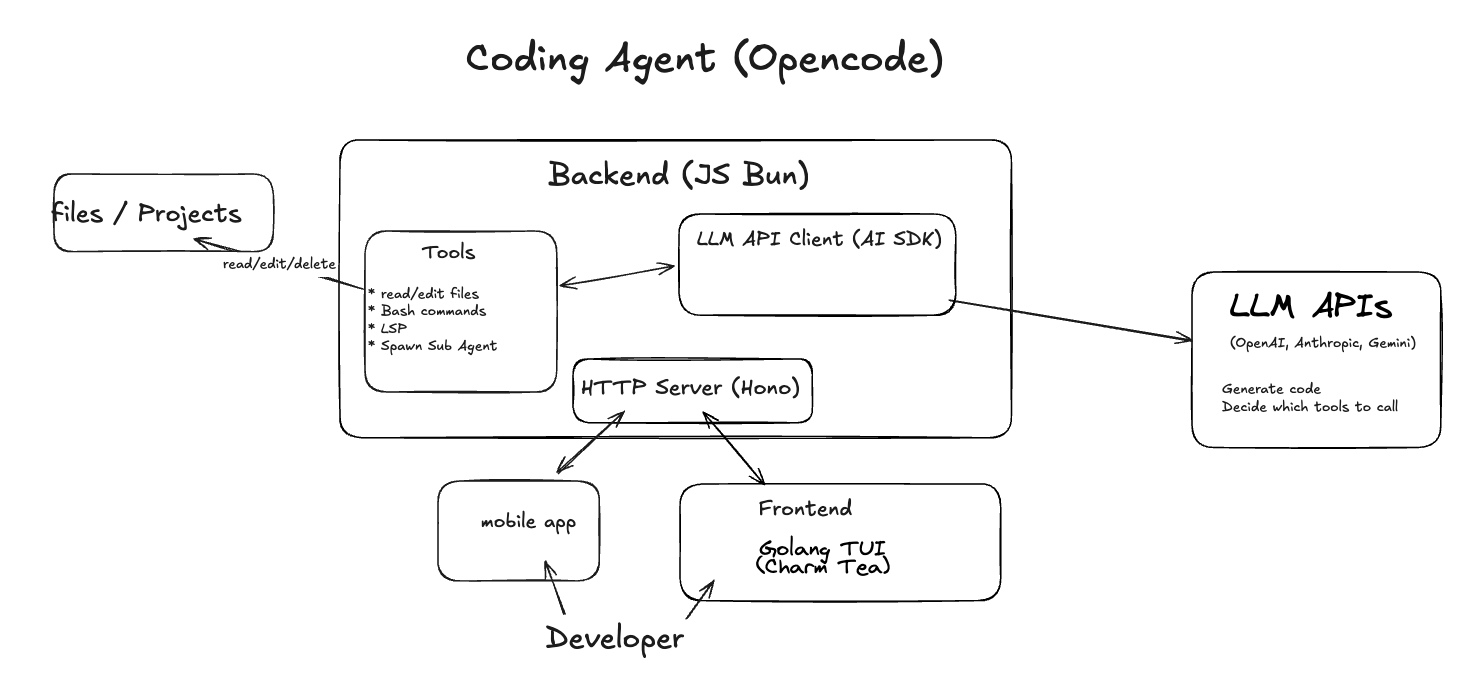
The backend runs on JavaScript in a Bun runtime, exposed through an HTTP server. In Opencode’s case, that server is Hono.
One great thing Opencode offers is that it’s provider-agnostic. It works with different models out of the box: you just drop in your API key and the magic happens. Most of the heavy lifting is handled by the AI SDK, which standardizes LLM usage across providers. That means you can use the same function calls and arguments to interact with Anthropic, OpenAI, Gemini, and others, and you can even self-host using any OpenAI-compatible endpoint by pointing to your own URL.
Developers or other apps/agents can interact with Opencode over HTTP. By default, running the opencode command launches both the JS HTTP server and a Golang TUI process. The user then interacts with the TUI to send prompts and inspect results as the session progresses. But thanks to Opencode’s client/server design, any client (a mobile app, web app, script, etc) can send HTTP requests to create a session and start hacking away. Naturally, all the actual work happens on the machine where the server is running.
Opencode generates SDK client code automatically using Stainless, which ingests an OpenAPI spec and produces high-quality, idiomatic client code with type safety. So instead of manually using an HTTP library to talk to the server, you get type-safe, ready-to-use functions out of the box.
A key part of a coding agent is its tools, the actions it can take to actually do useful work:
- browse, read, and edit files
- run bash commands
- fetch content from a URL
- integrate with LSP servers to get code diagnostics
These tools are what transform an LLM from a simple chat interface into an actor inside your system: reading files, running commands, editing code, observing results, and iterating. The LLM is the brain and the tools are the arms and feet.
But a full-fledged coding agent needs even more: remembering previous sessions, managing permissions (e.g. can the agent run any tool, or should it require some approval?), undoing file changes after tool error (a bash command gone wrong), coordinating with LSP servers and MCP clients, and so on.
The devil’s in the details. It’s easy enough to wire up a few tools and get an agent making changes, but building a delightful developer experience, with smooth workflows, clean architecture, and reliability, is no small feat.
System Prompt
The system prompt is given to the LLM along with the list of available tools. The developer then provides a user prompt (e.g. “fix this bug”). From there, the LLM decides what to do. Maybe it needs to read a file related to the bug—so it outputs a tool_use. The LLM client (in this case, the AI SDK) runs that function on the user’s machine, and the tool’s output is fed back into the LLM’s context.
With this new context, the LLM might decide to make changes to the file—so it calls the edit tool, and the Bun runtime actually applies the edit. The system prompt also tells the LLM it can run the test suite using npm run test. At that point, the model can trigger a Bash command, check the results, and either stop or keep iterating.
Each provider has its own carefully crafted system prompt. For example, the Gemini system prompt:
1
2
3
4
5
6
7
8
9
10
11
12
13
14
15
16
17
18
19
20
21
22
23
24
25
26
27
28
29
You are opencode, an interactive CLI agent specializing in software engineering tasks. Your primary goal is to help users safely and efficiently, adhering strictly to the following instructions and utilizing your available tools.

...

# Operational Guidelines

## Tone and Style (CLI Interaction)
- **Concise & Direct:** Adopt a professional, direct, and concise tone suitable for a CLI environment.
- **Minimal Output:** Aim for fewer than 3 lines of text output (excluding tool use/code generation) per response whenever practical. Focus strictly on the user's query.
- **Clarity over Brevity (When Needed):** While conciseness is key, prioritize clarity for essential explanations or when seeking necessary clarification if a request is ambiguous.
- **No Chitchat:** Avoid conversational filler, preambles ("Okay, I will now..."), or postambles ("I have finished the changes..."). Get straight to the action or answer.
- **Formatting:** Use GitHub-flavored Markdown. Responses will be rendered in monospace.
- **Tools vs. Text:** Use tools for actions, text output *only* for communication. Do not add explanatory comments within tool calls or code blocks unless specifically part of the required code/command itself.
- **Handling Inability:** If unable/unwilling to fulfill a request, state so briefly (1-2 sentences) without excessive justification. Offer alternatives if appropriate.

## Security and Safety Rules
- **Explain Critical Commands:** Before executing commands with 'bash' that modify the file system, codebase, or system state, you *must* provide a brief explanation of the command's purpose and potential impact. Prioritize user understanding and safety. You should not ask permission to use the tool; the user will be presented with a confirmation dialogue upon use (you do not need to tell them this).
- **Security First:** Always apply security best practices. Never introduce code that exposes, logs, or commits secrets, API keys, or other sensitive information.

## Tool Usage
- **File Paths:** Always use absolute paths when referring to files with tools like 'read' or 'write'. Relative paths are not supported. You must provide an absolute path.
- **Parallelism:** Execute multiple independent tool calls in parallel when feasible (i.e. searching the codebase).
- **Command Execution:** Use the 'bash' tool for running shell commands, remembering the safety rule to explain modifying commands first.
- **Background Processes:** Use background processes (via \`&\`) for commands that are unlikely to stop on their own, e.g. \`node server.js &\`. If unsure, ask the user.
- **Interactive Commands:** Try to avoid shell commands that are likely to require user interaction (e.g. \`git rebase -i\`). Use non-interactive versions of commands (e.g. \`npm init -y\` instead of \`npm init\`) when available, and otherwise remind the user that interactive shell commands are not supported and may cause hangs until canceled by the user.
- **Respect User Confirmations:** Most tool calls (also denoted as 'function calls') will first require confirmation from the user, where they will either approve or cancel the function call. If a user cancels a function call, respect their choice and do _not_ try to make the function call again. It is okay to request the tool call again _only_ if the user requests that same tool call on a subsequent prompt. When a user cancels a function call, assume best intentions from the user and consider inquiring if they prefer any alternative paths forward.

...
The agent/model needs to be aware of the current context: Which project is it working on? What’s the current date and time? In addition to the provider-specific system prompt we just looked at (provided via SystemPrompt.provider(model.modelID)), the user can also supply their own system prompt (input.system), as well as agent-specific prompts.
The two main built-in agents are plan and build, but Opencode also lets users define their own. Each agent has its own system prompts, tools, and model. We’ll dig into sub-agents a bit later.
1
2
3
4
5
6
7
8
9
10
system.push(
      ...(() => {
        if (input.system) return [input.system]
        if (agent.prompt) return [agent.prompt]
        return SystemPrompt.provider(model.modelID)
      })(),
    )
    system.push(...(await SystemPrompt.environment())) // `  Working directory: ${Instance.directory}`  `  Platform: ${process.platform}`  Today's date: ${new Date().toDateString()}`
    system.push(...(await SystemPrompt.custom())) // "AGENTS.md", "CLAUDE.md"
Not all tools are accessible to all agents. plan agent is not allowed to run edit and must ask permissions for bash. And user can define their own agents and limit the set of tools they can access.
Tools
So we have the system prompt. Now we need the magical tools—the actual actions the agent can take (bash, edit, webfetch).
Not all tools are available to every agent. For example, the plan agent isn’t allowed to run edit and must request permission to use bash. Users can also define their own agents and restrict which tools they can access.
1
2
3
4
5
6
7
8
9
10
11
12
13
14
  // Built-in tools that ship with opencode
  const BUILTIN = [
    BashTool, // run bash command
    EditTool, // edit a file
    WebFetchTool, // fetch web URL content
    GlobTool, // find files that match a pattern in a directory e.g. "**/*.js"
    GrepTool, // look for a pattern (e.g. "log.*Error") in files filtered by pattern (e.g. *.log)
    ListTool, // list files in dir
    ReadTool, // read a file
    WriteTool, // write a file
    TodoWriteTool, // write todo list (possibly update by overriding existng one)
    TodoReadTool, // read todo list
    TaskTool, // handle a task by launching a new sub-agent.
  ]
LLM APIs accept a list of tools (each with a description and input schema) that can be included in the API call. The model will then invoke a tool if it deems it relevant. For example:
1
2
3
4
5
6
7
8
9
10
11
12
13
14
15
16
17
18
19
20
21
22
23
24
25
26
27
28
29
30
31
32
33
34
35
36
37
38
39
40
41
42
43
44
45
46
47
48
49
50
51
52
53
54
55
56
57
# https://docs.anthropic.com/en/docs/agents-and-tools/tool-use/overview
import anthropic
client = anthropic.Anthropic()
response = client.messages.create(
    model="claude-opus-4-1-20250805",
    max_tokens=1024,
    tools=[
        {
            "name": "get_weather",
            "description": "Get the current weather in a given location",
            "input_schema": {
                "type": "object",
                "properties": {
                    "location": {
                        "type": "string",
                        "description": "The city and state, e.g. San Francisco, CA",
                    }
                },
                "required": ["location"],
            },
        }
    ],
    messages=[{"role": "user", "content": "What's the weather like in San Francisco?"}],
)

# https://platform.openai.com/docs/guides/tools?tool-type=function-calling
from openai import OpenAI

client = OpenAI()

tools = [
    {
        "type": "function",
        "name": "get_weather",
        "description": "Get current temperature for a given location.",
        "parameters": {
            "type": "object",
            "properties": {
                "location": {
                    "type": "string",
                    "description": "City and country e.g. Bogotá, Colombia",
                }
            },
            "required": ["location"],
            "additionalProperties": False,
        },
        "strict": True,
    },
]

response = client.responses.create(
    model="gpt-5",
    input=[
        {"role": "user", "content": "What is the weather like in Paris today?"},
    ],
    tools=tools,
)
Fact: model companies care about the weather, a lot.
The AI SDK standardizes these tool calls and allows for a provider-agnostic approach. In Opencode, it goes as follows:
1
2
3
4
5
6
7
8
9
10
11
12
13
14
15
16
17
18
19
20
21
22
23
24
25
  for (const item of await ToolRegistry.tools(model.providerID, model.modelID)) {
      if (Wildcard.all(item.id, enabledTools) === false) continue  // ability to disable tools using a regex pattern
      tools[item.id] = tool({ // define a tool https://ai-sdk.dev/docs/reference/ai-sdk-core/tool#tool
        id: item.id as any,
        description: item.description,
        inputSchema: item.parameters as ZodSchema,
        async execute(args, options) {
          // ...
          const result = await item.execute(args, {
            sessionID: input.sessionID,
            abort: options.abortSignal!,
            messageID: assistantMsg.id,
            callID: options.toolCallId,
            agent: agent.name,
            // ..
          })
        toModelOutput(result) {
          return {
            type: "text",
            value: result.output,
          }
        },
        }
      })
    }
The key parts of a tool definition are its description (prompt), parameters (args), and the execute function that performs the actual work.
Opencode also supports MCP (Model Context Protocol) tools (I made a deep dive video on this here). This means you can point to a local or remote MCP server and make its tools available to your agent. MCP servers are defined in the config files, and on startup Opencode automatically creates MCP clients that fetch the list of tools from those servers.
1
2
3
4
 for (const [key, item] of Object.entries(await MCP.tools())) {
    // ...
    tools[key] = item
 }
A couple of points. First, Opencode has a handy plugin system where plugins can be registered to run before and after each tool call. This is useful for things like logging, auditing, and more.
Second, here’s how tools actually work: the LLM is given the tool’s input schema (arguments) and description. The decision to run a tool is made by the model itself. When that happens, the AI SDK calls the tool’s execute function, which is defined in the JS code and runs inside the Bun/JS runtime. For MCP tools, the call instead goes through the MCP client, which sends a request to the MCP server (local or remote/HTTP).
Let ‘s explore a few tools definitions.
Read
1
2
3
4
5
6
7
8
9
10
11
12
13
14
15
16
17
18
19
20
21
22
23
24
25
26
27
28
29
30
31
32
33
34
35
36
37
38
39
40
41
42
43
44
45
46
47
48
49
50
51
52
53
54
export const ReadTool = Tool.define("read", {
  description: DESCRIPTION,
  parameters: z.object({
    filePath: z.string().describe("The path to the file to read"),
    offset: z.coerce.number().describe("The line number to start reading from (0-based)").optional(),
    limit: z.coerce.number().describe("The number of lines to read (defaults to 2000)").optional(),
  }),
  async execute(params, ctx) {
    let filepath = params.filePath
    if (!path.isAbsolute(filepath)) {
      filepath = path.join(process.cwd(), filepath)
    }
    if (!ctx.extra?.["bypassCwdCheck"] && !Filesystem.contains(Instance.directory, filepath)) {
      throw new Error(`File ${filepath} is not in the current working directory`)
    }

    const file = Bun.file(filepath)
    // ..
    const limit = params.limit ?? DEFAULT_READ_LIMIT
    const offset = params.offset || 0
    const isImage = isImageFile(filepath)
    if (isImage) throw new Error(`This is an image file of type: ${isImage}\nUse a different tool to process images`)
    const isBinary = await isBinaryFile(filepath, file)
    if (isBinary) throw new Error(`Cannot read binary file: ${filepath}`)
    const lines = await file.text().then((text) => text.split("\n"))
    const raw = lines.slice(offset, offset + limit).map((line) => {
      return line.length > MAX_LINE_LENGTH ? line.substring(0, MAX_LINE_LENGTH) + "..." : line
    })
    const content = raw.map((line, index) => {
      return `${(index + offset + 1).toString().padStart(5, "0")}| ${line}`
    })
    const preview = raw.slice(0, 20).join("\n")

    let output = "<file>\n"
    output += content.join("\n")

    if (lines.length > offset + content.length) {
      output += `\n\n(File has more lines. Use 'offset' parameter to read beyond line ${offset + content.length})`
    }
    output += "\n</file>"

    // just warms the lsp client
    LSP.touchFile(filepath, false)
    FileTime.read(ctx.sessionID, filepath)

    return {
      title: path.relative(Instance.worktree, filepath),
      output,
      metadata: {
        preview,
      },
    }
  },
})
As we can see, reading a file isn’t just a matter of calling a standard library read or text function. Is the path absolute? If not, we need to make it so. Is the file an image or binary? In that case, we can’t process it. If the file is too large, we only read up to a certain limit to avoid overflowing the model’s context. What if the model wants to read from a specific position? We need to support reading from a particular line and make that clear to the model.
The DESCRIPTION explains to the model exactly how it should use the tool:
1
2
3
4
5
6
7
8
9
10
11
12
Reads a file from the local filesystem. You can access any file directly by using this tool.
Assume this tool is able to read all files on the machine. If the User provides a path to a file assume that path is valid. It is okay to read a file that does not exist; an error will be returned.

Usage:
- The filePath parameter must be an absolute path, not a relative path
- By default, it reads up to 2000 lines starting from the beginning of the file
- You can optionally specify a line offset and limit (especially handy for long files), but it's recommended to read the whole file by not providing these parameters
- Any lines longer than 2000 characters will be truncated
- Results are returned using cat -n format, with line numbers starting at 1
- This tool cannot read binary files, including images
- You have the capability to call multiple tools in a single response. It is always better to speculatively read multiple files as a batch that are potentially useful.
- If you read a file that exists but has empty contents you will receive a system reminder warning in place of file contents.
AGI hasn’t been achieved yet, but seeing models ingest a tool description, interpret it, and then emit a tool call with the correct input is truly impressive.
Bash
1
2
3
4
5
6
7
8
9
10
11
12
13
14
15
16
17
18
19
20
21
22
23
24
25
26
27
28
29
30
31
32
33
34
35
36
37
38
39
40
41
42
43
44
45
46
47
48
49
50
51
52
53
54
55
56
57
58
59
60
61
62
63
64
65
66
67
68
69
70
71
export const BashTool = Tool.define("bash", {
  description: DESCRIPTION,
  parameters: z.object({
    command: z.string().describe("The command to execute"),
    timeout: z.number().describe("Optional timeout in milliseconds").optional(),
    description: z
      .string()
      .describe(
        "Clear, concise description of what this command does in 5-10 words. Examples:\nInput: ls\nOutput: Lists files in current directory\n\nInput: git status\nOutput: Shows working tree status\n\nInput: npm install\nOutput: Installs package dependencies\n\nInput: mkdir foo\nOutput: Creates directory 'foo'",
      ),
  }),
  async execute(params, ctx) {
    const timeout = Math.min(params.timeout ?? DEFAULT_TIMEOUT, MAX_TIMEOUT)
    const tree = await parser().then((p) => p.parse(params.command))
    const permissions = await Agent.get(ctx.agent).then((x) => x.permission.bash)
    // ...
    if (needsAsk) {
      await Permission.ask({
        type: "bash",
        pattern: params.command,
        sessionID: ctx.sessionID,
        messageID: ctx.messageID,
        callID: ctx.callID,
        title: params.command,
        metadata: {
          command: params.command,
        },
      })
    }

    const process = exec(params.command, {
      cwd: Instance.directory,
      signal: ctx.abort,
      timeout,
    })

    //...
    process.stdout?.on("data", (chunk) => {
      output += chunk.toString()
      ctx.metadata({
        metadata: {
          output: output,
          description: params.description,
        },
      })
    })

    process.stderr?.on("data", (chunk) => {
      output += chunk.toString()
      ctx.metadata({
        metadata: {
          output: output,
          description: params.description,
        },
      })
    })
    //...
      if (output.length > MAX_OUTPUT_LENGTH) {
      output = output.slice(0, MAX_OUTPUT_LENGTH)
      output += "\n\n(Output was truncated due to length limit)"
    }

    return {
      title: params.command,
      metadata: {
        output,
        exit: process.exitCode,
        description: params.description,
      },
      output,
    }
This is the bash tool. Much has been omitted here (notably the check to ensure the command doesn’t access files outside the project directory). The execute function first verifies whether permissions are needed (for example, the plan agent must request user approval for bash). If permission is granted, the command is executed, and both stdout and stderr are captured and included in the returned output.
The description provided to the LLM is:
1
2
3
4
5
6
7
8
9
10
11
12
13
14
15
16
17
18
19
Executes a given bash command in a persistent shell session with optional timeout, ensuring proper handling and security measures.

Before executing the command, please follow these steps:

1. Directory Verification:
   - If the command will create new directories or files, first use the LS tool to verify the parent directory exists and is the correct location
   - For example, before running "mkdir foo/bar", first use LS to check that "foo" exists and is the intended parent directory

2. Command Execution:
   - Always quote file paths that contain spaces with double quotes (e.g., cd "path with spaces/file.txt")
   - Examples of proper quoting:
     - cd "/Users/name/My Documents" (correct)
     - cd /Users/name/My Documents (incorrect - will fail)
     - python "/path/with spaces/script.py" (correct)
     - python /path/with spaces/script.py (incorrect - will fail)
   - After ensuring proper quoting, execute the command.
   - Capture the output of the command.

...
todoread and todowrite
When seeing a coding agent for the first time and seeing create a todo list and cross off item from it, it’s really one of those things that feel so magical and under the hood Opencode provides the following todo tools to the LLM:
1
2
3
4
5
6
7
8
9
10
11
12
13
14
15
16
17
18
19
20
21
22
23
24
25
26
27
28
29
30
31
32
33
34
35
36
37
38
39
40
41
42
43
44
45
46
47
const TodoInfo = z.object({
  content: z.string().describe("Brief description of the task"),
  status: z.string().describe("Current status of the task: pending, in_progress, completed, cancelled"),
  priority: z.string().describe("Priority level of the task: high, medium, low"),
  id: z.string().describe("Unique identifier for the todo item"),
})
type TodoInfo = z.infer<typeof TodoInfo>

const state = Instance.state(() => {
  const todos: {
    [sessionId: string]: TodoInfo[]
  } = {}
  return todos
})

export const TodoWriteTool = Tool.define("todowrite", {
  description: DESCRIPTION_WRITE,
  parameters: z.object({
    todos: z.array(TodoInfo).describe("The updated todo list"),
  }),
  async execute(params, opts) {
    const todos = state()
    todos[opts.sessionID] = params.todos
    return {
      title: `${params.todos.filter((x) => x.status !== "completed").length} todos`,
      output: JSON.stringify(params.todos, null, 2),
      metadata: {
        todos: params.todos,
      },
    }
  },
})

export const TodoReadTool = Tool.define("todoread", {
  description: "Use this tool to read your todo list",
  parameters: z.object({}),
  async execute(_params, opts) {
    const todos = state()[opts.sessionID] ?? []
    return {
      title: `${todos.filter((x) => x.status !== "completed").length} todos`,
      metadata: {
        todos,
      },
      output: JSON.stringify(todos, null, 2),
    }
  },
})
There’s a global state of TODOs per session. To write, the LLM provides a list of TodoInfo items, each with content and a status (pending, in progress, completed, or cancelled), which are then assigned to the session ID in the global state. todoreadsimply returns the list mapped to the current session ID. When this data is sent back to the TUI, it’s displayed with checkmarks or strikethroughs as appropriate.
This tool is simple, but the LLM’s ability to use it effectively is a small sign of understanding, assuming, of course, the generated items aren’t complete garbage.
LSP
Opencode includes an LSP tool that helps provide code diagnostics after changes. The LSP server for a given language (gopls for Go, pyright for Python, ruby-lsp for Ruby, etc.) maintains a model of the project, understands the language, and can determine whether a change makes sense. Those squiggly lines you see in an IDE? They come from an LSP server.
Under the hood, the LSP server and the LSP client (your IDE or, in Opencode’s case, an instantiated client) communicate using JSON-RPC over standard I/O:
1
2
3
4
const connection = createMessageConnection(
  new StreamMessageReader(input.server.process.stdout),
  new StreamMessageWriter(input.server.process.stdin),
)
A diagnostics message from the LSP server might look like this:
1
2
3
4
5
6
7
8
9
10
11
12
{
  "uri": "file:///path/to/file.js",
  "diagnostics": [
    {
      "range": { "start": {"line": 10,"character": 4}, "end": {"line": 10,"character": 10} },
      "severity": 1,
      "code": "no-undef",
      "source": "eslint",
      "message": "'myVar' is not defined."
    }
  ]
}
Opencode elegantly spawns the LSP servers and clients and handles communication using a global Event Bus.
1
2
3
4
5
6
7
8
9
10
11
12
13
14
15
16
17
18
19
20
21
22
23
24
25
26
27
28
29
30
31
32
33
34
35
36
37
38
39
40
41
42
43
44
45
46
47
48
49
50
51
52
53
54
55
56
57
58
59
60
61
62
63
64
65
66
67
68
69
70
71
72
73
74
75
76
77
78
79
80
81
82
83
84
85
86
87
88
89
90
91
92
93
94
95
96
97
98

// example of an LSP server definition:
 export const Pyright: Info = {
    id: "pyright",
    extensions: [".py", ".pyi"],
    root: NearestRoot(["pyproject.toml", "setup.py", "setup.cfg", "requirements.txt", "Pipfile", "pyrightconfig.json"]),
    async spawn(root) {
      let binary = Bun.which("pyright-langserver")
      const args = []
      if (!binary) {
        const js = path.join(Global.Path.bin, "node_modules", "pyright", "dist", "pyright-langserver.js")
        if (!(await Bun.file(js).exists())) {
          if (Flag.OPENCODE_DISABLE_LSP_DOWNLOAD) return
          await Bun.spawn([BunProc.which(), "install", "pyright"], {
            cwd: Global.Path.bin,
            env: {
              ...process.env,
              BUN_BE_BUN: "1",
            },
          }).exited
        }
        binary = BunProc.which()
        args.push(...["run", js])
      }
      args.push("--stdio")

      const initialization: Record<string, string> = {}

      const potentialVenvPaths = [process.env["VIRTUAL_ENV"], path.join(root, ".venv"), path.join(root, "venv")].filter(
        (p): p is string => p !== undefined,
      )
      for (const venvPath of potentialVenvPaths) {
        const isWindows = process.platform === "win32"
        const potentialPythonPath = isWindows
          ? path.join(venvPath, "Scripts", "python.exe")
          : path.join(venvPath, "bin", "python")
        if (await Bun.file(potentialPythonPath).exists()) {
          initialization["pythonPath"] = potentialPythonPath
          break
        }
      }

      const proc = spawn(binary, args, {
        cwd: root,
        env: {
          ...process.env,
          BUN_BE_BUN: "1",
        },
      })
      return {
        process: proc,
        initialization,
      }
    },
  }

// inside the LSP module init, we launch the LSP servers and clients

for (const [name, item] of Object.entries(cfg.lsp ?? {})) {
        const existing = servers[name]
        //...
        servers[name] = {
          ...existing,
          id: name,
          root: existing?.root ?? (async () => Instance.directory),
          extensions: item.extensions ?? existing.extensions,
          spawn: async (root) => {
            return {
              process: spawn(item.command[0], item.command.slice(1), {
                cwd: root,
                env: {
                  ...process.env,
                  ...item.env,
                },
              }),
              initialization: item.initialization,
            }
          },
        }
      }
  // ..

    for (const server of Object.values(s.servers)) {
     // ...
      }
      const handle = await server.spawn(root).catch((err) => {
        s.broken.add(root + server.id)
        log.error(`Failed to spawn LSP server ${server.id}`, { error: err })
        return undefined
      })
      if (!handle) continue
      const client = await LSPClient.create({
        serverID: server.id,
        server: handle,
        root,
      })
     // ...
    }
When the LLM runs a tool to make changes to a file, Opencode queries the LSP server, gets the diagnostics, and passes them back to the LLM. This way, if the LLM uses myVar but it’s not defined (as in the example above), it can adjust its next action. In the edit tool function, after applying changes, the following lines are executed:
1
2
await LSP.touchFile(filePath, true)
const diagnostics = await LSP.diagnostics()
This feedback loop is extremely useful: it keeps the LLM grounded and prevents it from going off the rails.
SubAgents (The Task Tool)
All Opencode’s work is done by agents. There are two primary ones configured by default: the Plan and Build agents. The Plan agent handles planning and code analysis without making changes, while the Build agent relies on Plan’s analysis and can actually make changes by calling tools that alter files or the environment.
In addition to the primary agents, Opencode allows defining subagents, which can be invoked either by primary agents as a simple task tool call or directly by the user using an @ mention (e.g. @security-auditor review this code and check for security issues). Here’s an example of a subagent definition:
1
2
3
4
5
6
7
8
9
10
11
12
13
14
15
16
17
18
---
description: Reviews code for quality and best practices
mode: subagent
model: anthropic/claude-sonnet-4-20250514
temperature: 0.1
tools:
  write: false
  edit: false
  bash: false
---
You are in code review mode. Focus on:

- Code quality and best practices
- Potential bugs and edge cases
- Performance implications
- Security considerations

Provide constructive feedback without making direct changes.
Agents can be configured in many ways, but at the end of the day they need:
- a model
- some tools
- a system prompt explaining what they do and how they should do it
Agents invoke other agents using the task tool:
1
2
3
4
5
6
7
8
9
10
11
12
13
14
15
16
17
18
19
20
21
22
23
24
25
26
27
28
29
30
31
32
33
34
35
36
37
38
39
40
41
42
43
44
45
46
47
48
49
50
export const TaskTool = Tool.define("task", async () => {
  const agents = await Agent.list().then((x) => x.filter((a) => a.mode !== "primary"))
  const description = DESCRIPTION.replace(
    "{agents}",
    agents
      .map((a) => `- ${a.name}: ${a.description ?? "This subagent should only be called manually by the user."}`)
      .join("\n"),
  )
  return {
    description,
    parameters: z.object({
      description: z.string().describe("A short (3-5 words) description of the task"),
      prompt: z.string().describe("The task for the agent to perform"),
      subagent_type: z.string().describe("The type of specialized agent to use for this task"),
    }),
    async execute(params, ctx) {
      const agent = await Agent.get(params.subagent_type)

      const session = await Session.create(ctx.sessionID, params.description + ` (@${agent.name} subagent)`)
      const msg = await Session.getMessage(ctx.sessionID, ctx.messageID)
      if (msg.info.role !== "assistant") throw new Error("Not an assistant message")
      // ...
      const result = await Session.prompt({
        messageID,
        sessionID: session.id,
        model: { modelID: model.modelID, providerID: model.providerID },
        agent: agent.name,
        tools: {
          todowrite: false,
          todoread: false,
          task: false,
          ...agent.tools,
        },
        parts: [{
          id: Identifier.ascending("part"),
          type: "text",
          text: params.prompt,
        }],
      })
      unsub()
      return {
        title: params.description,
        metadata: {
          summary: result.parts.filter((x: any) => x.type === "tool"),
        },
        output: (result.parts.findLast((x: any) => x.type === "text") as any)?.text ?? "",
      }
    },
  }
})
So what’s going on here? The Task tool works like any other tool:
- Its description is the list of available agents and their descriptions.
- Its
executefunction spins up a new session for the chosen subagent, provides it with the right tools and system prompt, and lets it run independently.
Here’s a snippet from the Task tool’s description:
1
2
3
4
5
6
7
8
9
10
11
12
13
14
15
16
17
18
Available agent types and the tools they have access to:
{agents}

When using the Task tool, you must specify a subagent_type parameter to select which agent type to use.

When to use the Agent tool:
- When you are instructed to execute custom slash commands. Use the Agent tool with the slash command invocation as the entire prompt. The slash command can take arguments. For example: Task(description="Check the file", prompt="/check-file path/to/file.py")

...

Usage notes:
1. Launch multiple agents concurrently whenever possible, to maximize performance; to do that, use a single message with multiple tool uses
2. When the agent is done, it will return a single message back to you. The result returned by the agent is not visible to the user. To show the user the result, you should send a text message back to the user with a concise summary of the result.
3. Each agent invocation is stateless. You will not be able to send additional messages to the agent, nor will the agent be able to communicate with you outside of its final report. Therefore, your prompt should contain a highly detailed task description for the agent to perform autonomously and you should specify exactly what information the agent should return back to you in its final and only message to you.
4. The agent's outputs should generally be trusted
5. Clearly tell the agent whether you expect it to write code or just to do research (search, file reads, web fetches, etc.), since it is not aware of the user's intent
6. If the agent description mentions that it should be used proactively, then you should try your best to use it without the user having to ask for it first. Use your judgement.
...
In practice, a new session is created for the subagent, spun up by the primary agent. The subagent gets its own tools and system prompt, and runs in its own context window—possibly even with a different LLM.
This recursive behavior, where one LLM decides to invoke another (or multiple others), is where we start to see early glimpses of full autonomy.
The output of the Task tool is simply the output of the subagent’s LLM prompt—potentially including tool calls. Nice.
The 1 trillion dollar loop
Let’s recap. We have the system prompt, the tools with their descriptions and execute functions, and the user’s input. All of this is sent to the LLM API—and that’s where the magic happens.
All these pieces come together in the Session.prompt function. When a user submits a prompt in the TUI (terminal), the Go code sends an HTTP request to the JS Hono server. While this flow is typically used in the TUI, any client capable of making HTTP requests can interact with the server and drive the agent.
Prompt receives the user’s input. Since the conversation history can grow quickly and fill up the model’s context, Opencode automatically summarizes the session if tokens > Math.max((model.info.limit.context - outputLimit) * 0.9, 0). The summary prompt looks like this:
1
2
3
4
5
6
7
8
9
10
11
12
13
14
15
16
17
18
19
20
21
22
23
const stream = streamText({
  maxRetries: 10,
  abortSignal: abort.signal,
  model: model.language,
  messages: [
    ...system.map(
      (x): ModelMessage => ({
        role: "system",
        content: x,
      }),
    ),
    ...MessageV2.toModelMessage(filtered),
    {
      role: "user",
      content: [
        {
          type: "text",
          text: "Provide a detailed but concise summary of our conversation above. Focus on information that would be helpful for continuing the conversation, including what we did, what we're doing, which files we're working on, and what we're going to do next.",
        },
      ],
    },
  ],
})
This allows the conversation to continue smoothly. Still, I find it best to start fresh when nearing the limit.
There are two main modes: build and plan, each represented by its own agent. The plan agent is exploratory—it produces a read-only plan without editing files. The build agent, as the name suggests, can edit files, run commands, and execute tasks. Switching from plan to build is marked by a special system reminder, aptly named the build-switch:
1
2
3
4
5
<system-reminder>
Your operational mode has changed from plan to build.
You are no longer in read-only mode.
You are permitted to make file changes, run shell commands, and utilize your arsenal of tools as needed.
</system-reminder>
1
2
3
4
5
6
7
8
9
10
if (lastAssistantMsg?.mode === "plan" && agent.name === "build") {
  msgs.at(-1)?.parts.push({
    id: Identifier.ascending("part"),
    messageID: userMsg.id,
    sessionID: input.sessionID,
    type: "text",
    text: BUILD_SWITCH,
    synthetic: true,
  })
}
At the core is the AI SDK’s streamText, which returns a fullStream of events: text, tool calls, tool results, and errors. A process function iterates over these events and handles them accordingly:
1
2
3
4
5
6
7
8
9
10
11
12
13
14
15
16
17
18
19
20
21
22
23
24
25
const stream = streamText({
  onError(e) {
    log.error("streamText error", { error: e })
  },
  maxRetries: 3,
  activeTools: Object.keys(tools).filter((x) => x !== "invalid"),
  maxOutputTokens: outputLimit,
  abortSignal: abort.signal,
  stopWhen: async ({ steps }) => steps.length >= 1000 || processor.getShouldStop(),
  temperature: params.temperature,
  topP: params.topP,
  messages: [
    ...system.map(
      (x): ModelMessage => ({
        role: "system",
        content: x,
      }),
    ),
    ...MessageV2.toModelMessage(msgs.filter((m) => !(m.info.role === "assistant" && m.info.error))),
  ],
  tools: model.info.tool_call === false ? undefined : tools,
})

const result = await processor.process(stream)
return result
The process function consumes the result stream and updates structured message parts for each event type (start-step, finish-step, tool-call, tool-result, tool-error, text-start, text-delta, etc.).
The AI SDK supports multi-step tool usage, effectively implementing “LLM in a loop with actions.” The model runs continuously, executing tools step by step, with a stopWhen parameter to control when the loop should end (e.g., after 5 tool calls).
For example:
1
2
3
4
5
6
7
8
9
10
11
12
13
14
15
16
17
18
19
20
21
22
23
24
25
26
27
28
29
30
31
32
33
34
35
36
37
38
39
40
41
42
43
44
45
46
47
48
49
50
51
52
53
54
55
56
57
58
59
60
61
62
63
64
65
66
67
68
async process(stream: StreamTextResult<Record<string, AITool>, never>) {
  for await (const value of stream.fullStream) {
    switch (value.type) {
      case "tool-call": {
        const match = toolcalls[value.toolCallId]
        if (match) {
          const part = await updatePart({
            ...match,
            tool: value.toolName,
            state: {
              status: "running",
              input: value.input,
              time: { start: Date.now() },
            },
          })
          toolcalls[value.toolCallId] = part as MessageV2.ToolPart
        }
        break
      }
      case "tool-result": {
        await updatePart({
          ...match,
          state: {
            status: "completed",
            input: value.input,
            output: value.output.output,
            metadata: value.output.metadata,
            title: value.output.title,
            time: {
              start: match.state.time.start,
              end: Date.now(),
            },
          },
        })
        break
      }
      case "tool-error": {
        const match = toolcalls[value.toolCallId]
        if (match && match.state.status === "running") {
          if (value.error instanceof Permission.RejectedError) {
            shouldStop = true
          }
        }
        break
      }
      case "text-delta":
        if (currentText) {
          currentText.text += value.text
          if (currentText.text) await updatePart(currentText)
        }
        break
      case "text-end":
        if (currentText) {
          currentText.text = currentText.text.trimEnd()
          currentText.time = { start: Date.now(), end: Date.now() }
          await updatePart(currentText)
        }
        currentText = undefined
        break
      case "start-step":
        snapshot = await Snapshot.track()
        break
      case "finish-step":
        const usage = getUsage(model, value.usage, value.providerMetadata)
        break
    }
  }
}
As the stream is processed, results are written to disk via updatePart. If a tool-error occurs due to a permission rejection, shouldStop is set to true.
A key detail: finish-step calls getUsage, which calculates token usage and cost. Each chunk includes usage stats (input, output, reasoning tokens). Combined with model pricing data (from models.dev), Opencode computes the cost of each run.
Another clever feature is snapshotting at step-start. This uses Git to capture the working state without altering history—essentially a temporary commit. If something goes wrong, Opencode can restore by reloading the snapshot into the index and checking it out.
1
2
3
4
5
6
7
8
9
10
11
export async function track() {
  await $`git --git-dir ${git} add .`.quiet().cwd(Instance.directory).nothrow()
  const hash = await $`git --git-dir ${git} write-tree`.quiet().cwd(Instance.directory).nothrow().text()
  return hash.trim()
}

export async function restore(snapshot: string) {
  log.info("restore", { commit: snapshot })
  const git = gitdir()
  await $`git --git-dir=${git} read-tree ${snapshot} && git --git-dir=${git} checkout-index -a -f`
}
So, the LLM runs, the result stream is processed, and everything is persisted to disk as part of the session. Each persisted message part (text, tool call, result, etc.) also emits an event through a shared bus across the app. This bus is exposed over HTTP via continuous SSE events. The Go TUI client receives updates in real time, but any HTTP client subscribed to /sse can do the same.
In short: the TUI sends a prompt → the HTTP server calls Session.prompt → prompts, history, summaries, tools, and execution functions are prepared → the LLM responds with text and tool calls → results are persisted and broadcast in real time to the Event Bus and its clients, including the TUI, so the developer sees messages in real time—along with any other subscribed client (a mobile app, another TUI, etc).
The Magnificent TUI
Opencode puts a strong emphasis on its TUI, stating in the README that “we are going to push the limits of what’s possible in the terminal.” A full deep dive into the TUI code deserves its own blog post, but let’s quickly look at how it ties into the JS side.
The opencode command launches a standalone binary generated via bun build .. --compile. This bundles together the code, imported packages, and the Bun runtime into a single executable. What’s particularly neat is that the Golang TUI (compiled separately with go build) is packaged right alongside the Bun binary.
1
2
3
4
5
6
7
8
    "build() {",
    `  cd "opencode-\${pkgver}"`,
    `  bun install`,
    "  cd packages/tui",
    `  CGO_ENABLED=0 go build -ldflags="-s -w -X main.Version=\${pkgver}" -o tui cmd/opencode/main.go`,
    "  cd ../opencode",
    `  bun build --define OPENCODE_TUI_PATH="'$(realpath ../tui/tui)'" --define OPENCODE_VERSION="'\${pkgver}'" --compile --target=bun-linux-x64 --outfile=opencode ./src/index.ts`,
    "}",
When the user runs the opencode, they invoke the bun command which will launch the HTTP server then start the TUI
1
2
3
4
5
6
7
8
9
10
11
12
13
14
15
16
17
18
19
20
21
22
23
24
25
26
27
28
29
30
31
32
33
34
35
36
37
38
39
40
41
42
43
44
45
46
47
48
49
50
        const server = Server.listen({
          port: args.port,
          hostname: args.hostname,
        })

        let cmd = [] as string[]
        const tui = Bun.embeddedFiles.find((item) => (item as File).name.includes("tui")) as File
        if (tui) {
          let binaryName = tui.name
          if (process.platform === "win32" && !binaryName.endsWith(".exe")) {
            binaryName += ".exe"
          }
          const binary = path.join(Global.Path.cache, "tui", binaryName)
          const file = Bun.file(binary)
          if (!(await file.exists())) {
            await Bun.write(file, tui, { mode: 0o755 })
            await fs.chmod(binary, 0o755)
          }
          cmd = [binary]
        }
        if (!tui) {
          const dir = Bun.fileURLToPath(new URL("../../../../tui/cmd/opencode", import.meta.url))
          await $`go build -o ./dist/tui ./main.go`.cwd(dir)
          cmd = [path.join(dir, "dist/tui")]
        }
        Log.Default.info("tui", {
          cmd,
        })
        const proc = Bun.spawn({
          cmd: [
            ...cmd,
            ...(args.model ? ["--model", args.model] : []),
            ...(args.prompt ? ["--prompt", args.prompt] : []),
            ...(args.agent ? ["--agent", args.agent] : []),
            ...(sessionID ? ["--session", sessionID] : []),
          ],
          cwd,
          stdout: "inherit",
          stderr: "inherit",
          stdin: "inherit",
          env: {
            ...process.env,
            CGO_ENABLED: "0",
            OPENCODE_SERVER: server.url.toString(),
            OPENCODE_PROJECT: JSON.stringify(Instance.project),
          },
          onExit: () => {
            server.stop()
          },
        })
Bun spawns the TUI, which then takes over the stdin and stdout of the opencode/bun process. If there’s no embedded TUI binary, the TUI is launched from the current source by building it with go build .... This is what happens in dev mode when running bun dev. Pretty slick.
Another nice detail is how the TUI relies on the SDK generated by Stainless to interact with the backend. By leaning on the OpenAPI/Stainless spec to generate client code, Opencode has clean extensibility and a consistent interface between components.
Closing Thoughts
Digging through the code and seeing how things are implemented was a lot of fun! I learned quite a bit, and since I’m no TS/JS expert, I also enjoyed the opportunity to explore those. That said, TS types are far from being God’s gift to humanity.
The Opencode codebase is impressively readable—and, ironically, didn’t feel AI-generated at all.
One key takeaway is that LLMs and tools are just one small part of the puzzle. Having a well-architected app with a solid UX/DX is equally, if not more, important.
Another takeaway is that we already have some tremendously powerful building blocks, and putting them together results in great products.
Get in touch on Twitter/X at @moncef_abboud.